Monday, October 12, 2009

Tomato Tart or How to Make Pretty with Fall Tomatoes

tomato onion tart
I made this several weeks ago when the days were longer and the nights were warmer. But, at least here in Western Oregon, a few tomatoes still survive on the vine—they aren’t quite as pretty as their August cousins but they still taste good and to beat the frost they need to be picked fast.


One of the many reasons I love savory tarts is that they are light and vibrant looking enough to serve al fresco on warm days but still substantial enough to satisfy when the air turns crisp. I adapted this recipe from one I found on Epicurious (originally from Gourmet, RIP) I made the crust with a bit of whole-wheat flour and cracked pepper to give it some heft and for the cheeses in the filling I used what ever was on hand. One of the comments suggested using a salad spinner to remove some of the juice and seeds from the tomatoes. GREAT idea. I took those tomatoes for a spin three times and was surprised by the amount of juice and seeds I extracted. Without that step the tart would have been soupy and/or soggy.


Spin sliced tomatoes in a salad spinner to remove seeds and excess juice

Here is a list of the ingredients I used to give you an idea how flexible this recipe is.


For the crust


½ cup WW flour

1 ½ cups unbleached AP flour

¾ cup unsalted butter

1 ½ tsp kosher salt

Several turns of fresh cracked black pepper


whole wheat cracked pepper flaky tart crust

For the filling


1 Walla Walla onion

½ red onion

Tsp olive oil for sautéing

1 cup crumbled goat cheese

½ cup shredded Romano

½ cup shredded mozzarella

2 ½ cups assorted cherry tomatoes, sliced in half and given several spins in the salad spinner

Fresh chives, minced (for garnish)


tomato onion tart

Saturday, August 29, 2009

Chive Pesto Grilled Cheese- two great tastes that taste great together

chive pesto grilled cheese sandwichMmmm, grilled cheese. Nothing says back to school like a grilled cheese sandwich.

Somehow, somewhere somebody taught me how to make a proper grilled cheese sandwich. For that I thank you. I know it seems simple enough but there are tricks.

  • The bread should be well buttered on the outside and slathered with enough mustard (or, in this case, chive pesto) to add a tangy burst of flavor to the sandwich without overwhelming it. Aged cheddar and hearty rye can take more mustard than say mozzarella on ciabatta.
  • Finding the ideal cheese-to-bread ratio is also important. I love cheese but I resist the urge to pile it on, too much and the cheese oozes out of the sandwich like Oobleck. No more than one layer of 1/4 inch thick slices of your cheese of choice are necessary.
  • A cast iron griddle or skillet is best because a low even heat is key. Too hot and the bread is black but the cheese is still hard in the center, not hot enough and you lose precious cheese out the sides while the bread remains barely browned. Ideally the bread achieves a deep golden brown at precisely the same moment as the cheese has a total meltdown. (The sandwich pictured could have been a bit darker...oh well.) I have seen fights erupt over a grilled cheese cooked too quickly at too hot a heat. I set the burner on medium-low and adjust accordingly when I flip the sandwich over. Aiming for about 5-6 minutes a side, cheese soft but not yet oozing when I flip.

Wednesday, August 26, 2009

Pesto Pesto Pesto

chive pesto


My goal for the day was to finish a short story that has been languishing in its nascent stages for months now. I’m so fond of the beginning that I’m afraid I’m going to screw up the end. So I did some necessary research and then abandoned the story for the pile of herbs beckoning from the kitchen counter, which were also languishing but will not keep until tomorrow. Some sprigs of arugula, piles of basil, an armload of chives, and some garlic that must also be used to make way for this year’s harvest- what else was there to do but make pesto?

The following recipe is made to my own taste- I love garlic, am allergic to most nuts and dislike the rest, adore cheese, and put fresh ground pepper in almost everything savory (I’ve even tried a grind or two of pepper to a chocolate dish). The arugula leaves I used were from plants that had gone to seed, too tired and haggard for a salad but once whirred up they looked just fine.

Garlicky Arugula and Two Basil Pesto

1 cup packed arugula leaves with stemmy bits removed
2 cups packed sweet basil leaves
1 cup packed spicy globe basil leaves
5 cloves of minced garlic
¼ cup extra virgin olive oil
¼ cup coarsely chopped Pecorino Romano cheese (I’d use parmesan too if I could afford it.)
Salt and pepper to taste (I added just a pinch of salt and three or four grinds of pepper).

arugula basil pesto

Put all ingredients in a food processor and process until all ingredients are finely chopped and well incorporated, pausing once or twice to scrape the sides of the bowl and test for desired consistency (I like my pesto pretty finely chopped but you may prefer a rougher texture). Add a drizzle or two more olive oil if it is too thick for you. This is when I taste to see if any salt is needed.


Garlic Chive Pesto

Same as above substituting 5 cups of coarsely chopped chives for the basil and arugula. You might want to cut down a bit on the garlic as the chives have enough kick on their own.

A note about nuts- as stated above I don’t use them but I’ve heard from people that do that pistachios (1/2 cup or so shelled) are quite tasty in the chive pesto. Pine nuts are, of course, traditional but walnuts or cashews are lower cost alternatives.

This recipe makes a thick pesto ideal for tossing with pasta, putting on pizza, and spreading on bread, crackers, or vine ripe tomatoes. Well covered it stores in the refrigerator for about a week. The basil pesto can also be frozen in sealed plastic baggies with the all the air removed. Frozen it keeps for several months.

basil arugula pesto

Wednesday, August 19, 2009

Panzanella Salad and Ponderings


Catching the Elusive Ingredient:

An essay and one easy summer recipe

Bread fascinates and charms not just because it is the staff of life, blah de blah, but because it transforms. Flour, yeast, and water (okay a pinch of salt too, and sometimes olive oil) combine to make dough, kneaded from shaggy mess to supple mound. Add heat and the results literally make my mouth water (That actual drool, I get it now just writing about it.) More than flour, more than dough—Boule, baguette, batard… bread! These are not new observations; bread is an ancient and mysterious magic trick.∗

Baking bread, documenting the process and the end result, and then posting it online where anyone with a computer or an internet capable phone can see it—that is a more recent phenomenon. But, as the thousand upon thousand of food blogs attest, even THIS is not a revelation. Why do it then? Why is the eating not enough? When did I start scorning my food because I don’t think it is pretty enough?

In the last two months I have posted two sets of recipes and photographs. I assure you that that is not all I have eaten. And almost everything I’ve eaten has been made at home with as many seasonal and fresh products as possible. Sometimes I even took pictures. But I haven’t shared. More accurately, I haven’t shared this way. Neighbors, friends, and the fellow—I’ve shared with them. I’ve been eating and living, but, to extend the bread metaphor, this month has been somewhere between shaggy mess and supple mound: all the ingredients are there but I’m afraid to knead, afraid to apply heat. So you (oh elusive reader) get no recipe, no photos, and I have nothing to show that I was here.

Maybe I’m supposed to fake it and pretend that food, like life, is easy and that the end result is always pretty. But tarting up my tart to make friends and influence people sucks the joy out of it and, I’m convinced, some of the fruity goodness too. But today I remembered that I took pictures of what I cooked or baked or threw together for years before I started posting them online. My tarts may not make the world love me but a salad, difficult to photograph but cool and fresh and low in calories, will sustain me. What’s that elusive ingredient? I don’t know, I haven’t found it yet. But until then I’ll keep tasting and when the weather cools back down I’ll continue baking. But in the meantime here’s an idea to use up the little nubbins of bread that are too small or too stale to eat as is.

A Variation on Panzanella Salad

The problem with bread is that it doesn’t last. If I wolf it down all at once I’m left wanting more but if I dole out a loaf over several days I run the risk of mold or, worse, disappointment. It saddens me when bread I baked goes stale. How can something so good go so bad? But do I toss it to the curb? Heck no. I make croutons. And if there isn’t quite enough bread left to justify croutons I throw the nubbins in the freezer and wait until there is.

crouton in panzanella salad

Croutons

Bread (stale, fresh, rye, wheat, white, sourdough, savory, or sweet—I don’t think it matters) cut into bite size chunks.
Enough olive oil to lightly coat
Salt and Pepper to taste
Seasonings (garlic powder, paprika, a dried herb blend such as Herbs De Provence—again it varies depending on what I have and how spicy I feel)

Toss bread with enough olive oil to coat, add seasonings and toss again. Then either spread seasoned bread out onto a cookie sheet and bake in a preheated 325 degree oven until lightly browned and crisp throughout (usually somewhere between 15-30 minutes depending on the size of the croutons and the type of bread). For a small batch I’ll brown the croutons in my cast iron skillet on the stovetop. Sometimes I cook the croutons too long and while not burned they are almost unbearably crunchy. That is a good time to make Panzanella
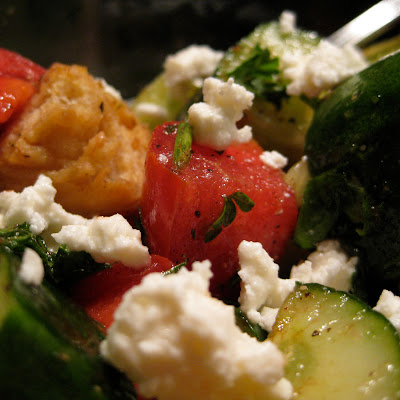
>panzanella salad
Panzanella

You can make panzanella with regular bread but I think it gets too soggy. I like to use croutons because it softens them up enough that you can still hear the conversation but you’re not left with mush. The key is garden fresh, juicy, tasty tomatoes – the winter supermarket variety will not do. The rest, I think, is a matter of taste.

Serves 2 hungry people or 4 peckish ones

2 tomatoes, cut into bite sized pieces
½-1 cucumber, chopped into bite size pieces
1 tablespoon white balsamic vinegar
1 tablespoon balsamic vinegar
2 tablespoons olive oil
1 cup croutons (see above) or stale bread pieces
Minced basil or parsley or a combination of the two
Salt and pepper to taste
½ cup feta or fresh mozzarella balls or ¼ cup shaved Parmesan or Romano (the cheese is optional, but I love cheese.)

In a medium bowl whisk together vinegars, olive oil, salt and pepper. Toss in cucumber and tomato and let sit for a few minutes. Add parsley and basil and croutons. Toss lightly. Allow the croutons to absorb some of the dressing, about five or ten minutes. If desired top with cheese and serve.

panzanella

∗ For a more thorough and thoughtful meditation on bread you might want to check out Peter Reinhart’s TED presentation.

Sunday, August 2, 2009

Hey Hey Tayberry Tart

tayberry tart


The berries have been arriving fast and furious at the farmers market for several weeks now. A bumper crop of delicious but delicate goodness so the price has been irresistible. When faced with a seemingly endless variety of raspberries, blackberries, and all their hybrid cousins, it seems hard to believe that a supermarket can sell one tiny half pint of anemic raspberries for five dollars come December. Like most of summer’s bounty berries are best on their own. Ah, the taste of summer exploding in your mouth. But why stop there? So this week I bring you two berry desserts, a tart (you know how I love those) and a pie.

tayberry tart

Tayberry (I swear the woman who sold me the last pint said tazberry, but apparently no such thing exists, a hybrid rasp/blackberry) Tart.

With thanks to Patricia Wells’ Café du Jura Raspberry Tart recipe from her cookbook “Bistro Cooking”. Normally I like to fiddle with a recipe but when one is as simple as this it seems unnecessary, although I did cut down on the sugar.

3 large egg yolks
¾ cup heavy cream
2 tablespoons granulated sugar (the original recipe called for 3 Tbsps)
1 Pate Sablee shell, pre-baked
1 pint of fresh tayberries (I ended up with slightly less because I couldn’t resist snacking)
2 teaspoons confectioners’ sugar.

tayberry tart ingredients

1. Preheat the oven to 375 F
2. In a large bowl first whisk the egg yolks then add the heavy cream and granulated sugar; mix until well blended. Pour the mixture into the cooled pastry shell.
3. Arrange the berries on top of the cream (the original recipe says carefully arrange but I didn’t have quite enough berries and the tayberries are larger than raspberries and prone to falling over, so carefully seems misleading.)
4. Place in the center of the oven and bake just until the cream filling begins to set, about 15 minutes. Dust with confectioners’ sugar. Allow to cool thoroughly before serving.

tayberry tart

Tuesday, July 21, 2009

Back and on a (Vietnamese style salad) roll.

After a long absence I think I’ve finally figured out what this blog should be about. Yes, I cook seasonally, but why? Because I shop first and plan the menu later. I look for sales, I look for what’s fresh, and I keep the shelves stocked with staples. My staples may not be your staples (i.e.: fish sauce, lime juice, cumin, chiles in all forms, rice paper, rice noodles, etc.) but they leave me room to experiment and go. I love grocery shopping, some girls go for shoes, I groove on bundles of greens, bright berries, and hmm what can I do with that?

A few weeks ago when asparagus was everywhere at the farmers market we ate asparagus in or with everything. There’s nothing better than asparagus tossed with a little olive oil, salt, and pepper, and then grilled. But that’s barely a recipe. So…

One of my favorite warm weather meals are Vietnamese style salad rolls, which manage to be refreshing, healthy, and filling all at the same time. And if you happen to have an Asian market near by (we’ve got Anzen just across the river) rice noodles and rice paper will only put you back a couple of dollars. While my rolling technique still leaves something to be desired (finding the happy medium between rolling tightly enough to keep everything together and not tearing the wrapper takes practice), I love that I can stuff just about anything in those wrappers.

Asparagus and Shrimp Vietnamese Style Salad Rolls

12 Vietnamese “Spring Rolls Skin” (they come in various sizes, for the asparagus I used the larger size)

¼ package rice noodles soaked for 3-5 minutes in boiling water until tender, drained, and tossed a few table spoons of Nouc cham (Tangy lime dipping sauce— you can find a recipe here).

24 cleaned shrimp, marinated in lime juice, garlic, ginger, cilantro, olive oil and hot chili flakes and then sautéed until just done, cooled and cut lengthwise. (Pork, chicken, and beef work equally well)

One bundle clean blanched asparagus, cut into 3-4 inch pieces

Mint, basil, and cilantro, minced. (If you’re feeling fancy reserve a few whole leaves of mint to place between the shrimp and the wrapper).

Bean sprouts (like everything else these are optional, I like the crunch)

Juilliened vegetables. ( I used carrots this time for color but cucumbers, sweet red peppers, shredded lettuce and scallions are also great).

With all your ingredients prepped and ready to go and a work surface cleared for assembly moisten two or three rice paper wrappers ( I run them under the faucet but some people dip them in a bowl of warm water and others still use a pastry brush) and set them out on a clean cloth. You can start piling on your ingredients immediately but make sure that the wrappers are soft and pliable before you begin to wrap. I usually start with a few whole sprigs of mint or cilantro and then lay out the shrimp pretty pink side down, piling the remaining ingredients on top. As I mentioned before my wrapping technique leaves something to be desired so if you want more detailed instructions you cant try here or here or just wing it based on the pictures and any burrito assembly experience you might have.

After the rolls are assembled cut in half for easier eating. Serve with one or more dipping sauces such as Nuoc cham, peanut sauce, or Thai sweet chili sauce.


asparagus shrimp salad roll
vietnamese style asparagus shrimp salad roll

Fresh Vietnamese Rice Paper Bundles on Foodista

Monday, June 8, 2009

Rhubarb Gastrique Galette w/ Goat Cheese OR Tarts Gone Wild

The word galette comes from the old French word ‘galet’, which means rounded pebble. Made with puff pastry or flaky pie or tart dough (let’s just say pate brisee from here on out, it sounds more authentic and is shorter to write) a galette is a tart gone wild, free form. Like a tart, a galette can be sweet or savory but since the crust is usually thinner a lighter application of fillings is advised.

rhubarb gastrique and goat cheese galette
Rhubarb Gastrique and Goat Cheese Galette

One batch sweet pate brisee dough
4 ounces goat cheese
Approximately ¾ cup Rhubarb Gastrique

When I made the dough for my asparagus buttermilk tart I whipped up a sweet dough as well, that way I only had to clean the food processor once. I used the same recipe and just added sugar.

While the oven preheated to 425, I rolled out the dough into a roughly round shape about a ¼ of an inch thick (I probably could have gone a little thinner but the dough was getting warm) and then transferred it to a Silpat baking mat (parchment paper also works but I don’t have any) to make getting the galette in and out of the oven easier. Then I slathered on some of the rhubarb gastrique, leaving about two inches of dough bare along the outside edges. On top of that I sprinkled four ounces of goat cheese and then folded the edges of the dough in, overlapping or folding as necessary, leaving the center exposed. I transferred the Silpat directly onto the pizza stone that’s always in the oven and baked on the middle rack for 35-40 minutes until the dough was golden brown. Serve warm or at room temperature. Simple and delicious, thumbs up from all the neighbors I shared with.

rhubarb gastrique and goat cheese galette